


If you’ve ever been curious about growing your own mushrooms - or you’ve already started and found yourself staring at spawn suppliers, trying to decipher the difference between mycelium and hyphae, or wondering whether fungi and mushrooms are even the same thing - you’re in the right place.
Mushroom growing comes with its own vocabulary. Words like mycelium, substrate, spawn and flush get thrown around as if everyone already knows what they mean. But when you’re just starting out, they can make the whole thing feel more complicated than it actually is.
It isn’t complicated. And once you understand what these words actually describe, you’ll find that growing mushrooms is one of the most straightforward, satisfying and quietly astonishing things you can do in your kitchen.
So let’s decode it, one word at a time.
A little early mushroom history won’t go amiss here.
It wasn’t until the 1950s that mushrooms were gifted their own kingdom. Up until that point they were uncomfortably placed in with the plants - the flora kingdom. But the truth is, they don’t photosynthesize, which technically kicks them out of that category entirely.
In many ways, mushrooms sit closer to the animal kingdom than the plant kingdom. They process oxygen, they can convert UV light into Vitamin D - as we do, and - crucially - they digest their food externally rather than producing it through sunlight. There are a few other remarkable similarities worth exploring, and we’ll be covering them in a dedicated post later this year.
Sign up to our newsletter or follow us on Substack so you don’t miss it.
For now, we’ll use plant-like terms where they help - roots, fruit, seeds - because they’re the closest shorthand we have. Just remember: mushrooms are something else entirely.
Mycelium
my-SEE-lee-um
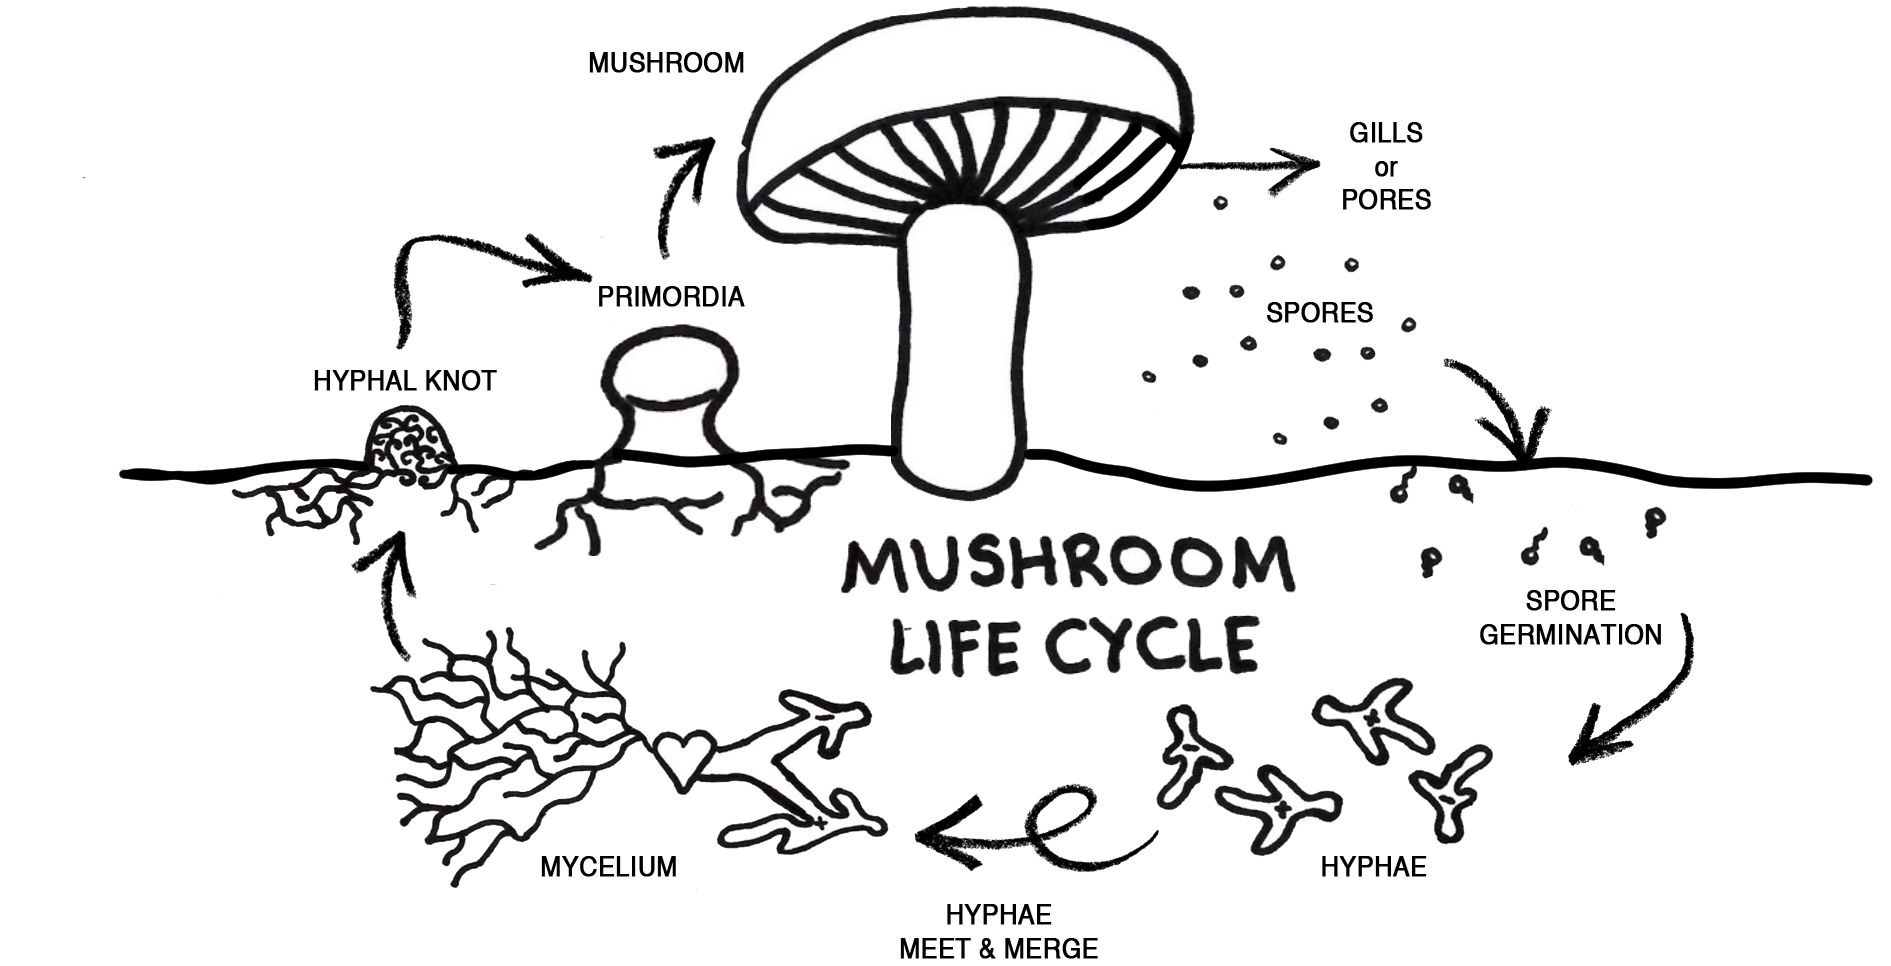
If you’ve ever turned a decaying log over in a forest, or grown one of our mushroom kits and noticed thin white threads or webbing - that’s mycelium. It’s the living, growing part of the fungus: a vast network of tiny thread-like structures called hyphae that spread through whatever the mushroom is growing on, breaking down organic material and absorbing nutrients.
Think of it this way: the mushroom you see and eat is the fruit. Mycelium does all the quiet, underground work - spreading, digesting, extracting. The mushroom appears when the conditions are right, and is simply fungi’s way of reproducing.
Hence the distinction worth knowing: all mushrooms are fungi, but not all fungi are mushrooms.
Mushroom grow kits are the best way to witness this process up close. Mycelium is the white, web-like structure that binds everything together - it turns loose materials like coffee grounds, sawdust and straw into a firm, white block. Over approximately 21 days, it grows and colonises the contents, slowly digesting the substrate and extracting its nutrients until it’s completely established.
Here at the farm, 21 days is our marker. When the whole block has turned white, we know the kit is ready - and that’s the exact point we send it out to our customers.
At Caley Brothers, watching mycelium colonise is one of the most fascinating parts of what we do. It’s something that usually happens underground and out of sight. Growing your own lets you witness it in real time.
Spawn
Mushroom spawn is to fungi what seeds are to plants - almost.
Spawn is a growing medium (usually grain, sawdust or wooden dowels) that also acts as a food source - something the mycelium feeds on until a bigger food source is introduced. Before any mycelium is introduced, the raw materials are sterilised and hydrated, creating a clean, humid environment for the mycelium to inhabit and thrive in.
When you introduce spawn to a substrate, the mycelium spreads outward, colonising its new environment. Our coffee kitsare the best way to witness this - the contrast is remarkable. Dark, soft, coffee-smelling grounds slowly transform as the mycelium spreads from the spawn, turning the substrate into a firm white block that smells of mushrooms. Once fully established and under the right conditions, that colonised substrate will go on to fruit beautiful mushrooms.

The most common types of spawn
Grain spawn - mycelium grown on wheat, rye or millet grains. It’s what we use in most of our Caley Brothers Ready-to-Grow kits. Grain spawn colonises quickly and evenly, making it ideal for beginners.
Sawdust spawn - mycelium on fine wood particles. Great for outdoor projects - unlike grain, sawdust won’t attract rodents. It’s a slower coloniser, but brilliant for wood-loving varieties like grey oyster mushrooms and King Stropharia when you’re building your mushroom beds.
Plug or dowel spawn - small wooden dowels impregnated with mycelium, inserted into holes drilled in hardwood logs. Perfect for a long-term outdoor growing project. A well-inoculated log can take anywhere from 9–18 months to fully colonise - but the payoff is worth the patience. With the sheer volume of nutrients available in a hardwood log, you can expect mushrooms fruiting for 3–5 years.
One important thing to know: spawn is alive
It needs to breathe and stay fresh. Most spawn should be kept refrigerated until you’re ready to use it - grain spawn within four weeks, log dowels within eight. Fresh spawn gives you the best possible chance of a successful grow, which is why at Caley Brothers we keep ours chilled at the farm right up until the moment it’s dispatched to you.
We stock oyster mushroom spawn, button mushroom spawn, and sawdust spawn for outdoor projects. If you can’t find what you need on our website, drop us an email at enquiries@caleybrothers.co.uk - we’re always happy to help.
Want to go deeper into spawn, log inoculation and outdoor growing?
Our book Project Mushroom covers all of this - written with Kew Gardens and from years of growing experience on our farm in West Sussex. Every technique in this glossary is covered in full, with step-by-step guidance.
A note on choosing your supplier
We know we’re not the only mushroom suppliers out there - and we’d never pretend otherwise. But if you’re looking to buy spawn or growing kits, our honest advice is this: go to a company that isn’t anonymous. Find someone whose passion matches yours. They’ll point you to the right product, they’ll pride themselves on quality, and they’ll actually be there when you have questions.
Any questions? Don’t be afraid to ask.
Substrate
The growing medium - what your mushrooms actually grow on
Substrate is the material your mushroom mycelium grows through and feeds on. Different varieties of mushroom thrive on different substrates - because in the wild, different fungi evolved to break down different organic materials.
Oyster mushrooms, for example, grow on hardwood logs, straw, coffee grounds, cardboard and paper in the wild. In our kits, we use a blend of hardwood sawdust, straw and used coffee grounds - all sourced from local businesses close to our farm in West Sussex.
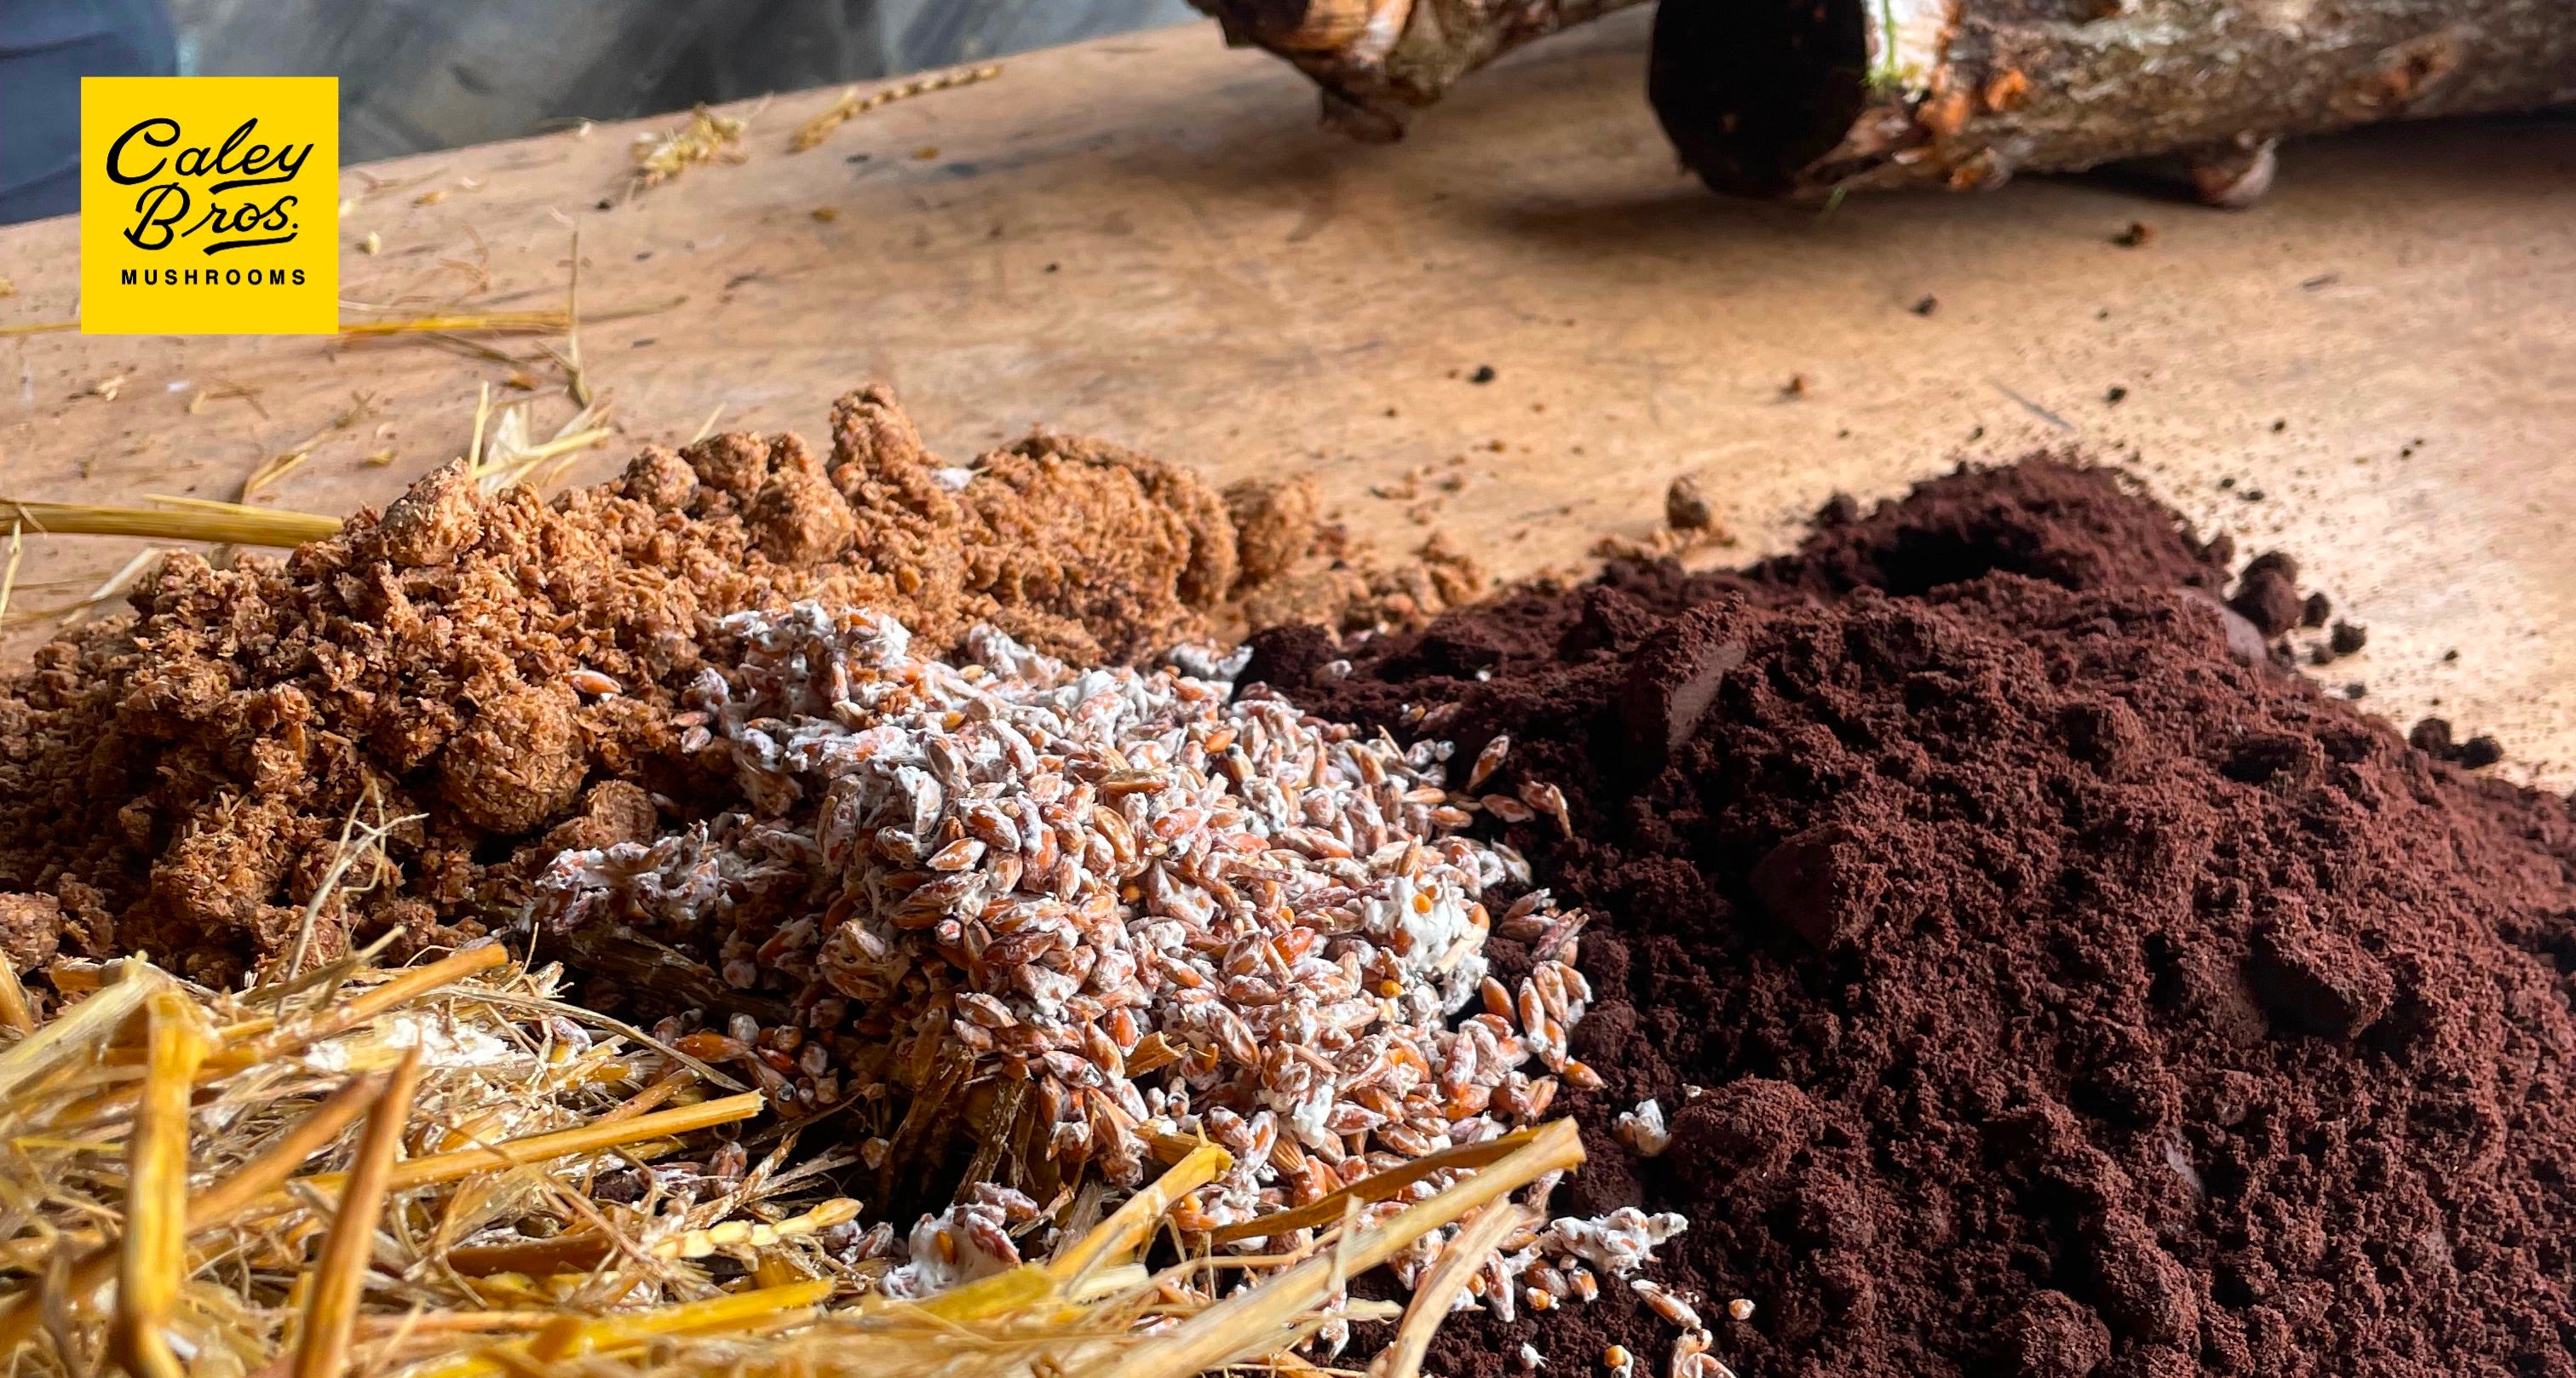
Shiitake, lion’s mane and reishi are a little more particular about their substrate and colonisation process. For these varieties, we’d recommend starting with a Ready-to-Grow kit rather than making your own - the conditions need to be more precise, and getting it right from the start sets you up for the best possible results.
Button mushrooms are different again. They’re compost-loving fungi, so their substrate is typically a mix of compost, manure and coco coir - quite different from the wood-based substrates used for gourmet varieties
The beauty of substrate is that it’s often made from what would otherwise be thrown away. Used coffee grounds, old books, a pair of worn-out jeans - oyster mushrooms will grow on almost any lignocellulosic material (that’s a fancy way of saying anything made of plant fibres). It’s one of the things we love most about mushrooms: they’re the great recyclers of the natural world.
Once the mycelium has fully colonised the substrate - turning it white and binding it together - the block becomes firm, earthy-smelling and alive. It’s ready to fruit.
In our workshops, we often describe mycelium as ‘the egg in the cake mix’ - it’s what binds everything together. And it’s why mycelium in the garden and our wider outdoor environment is so important. Without it, our soil would erode, lost in water run-off. We could go on - and we will.
We have a dedicated piece coming in September: ‘What is mycelium - and why is everyone suddenly talking about it?’
Make sure you’re following us on Substack or signed up to our newsletter so you don’t miss it.
Flush
The moment everything pays off
A flush is a crop of mushrooms - a flurry of growth that appears when the conditions are right. We sometimes call it a bouquet instead, because honestly, they’re just that pretty.
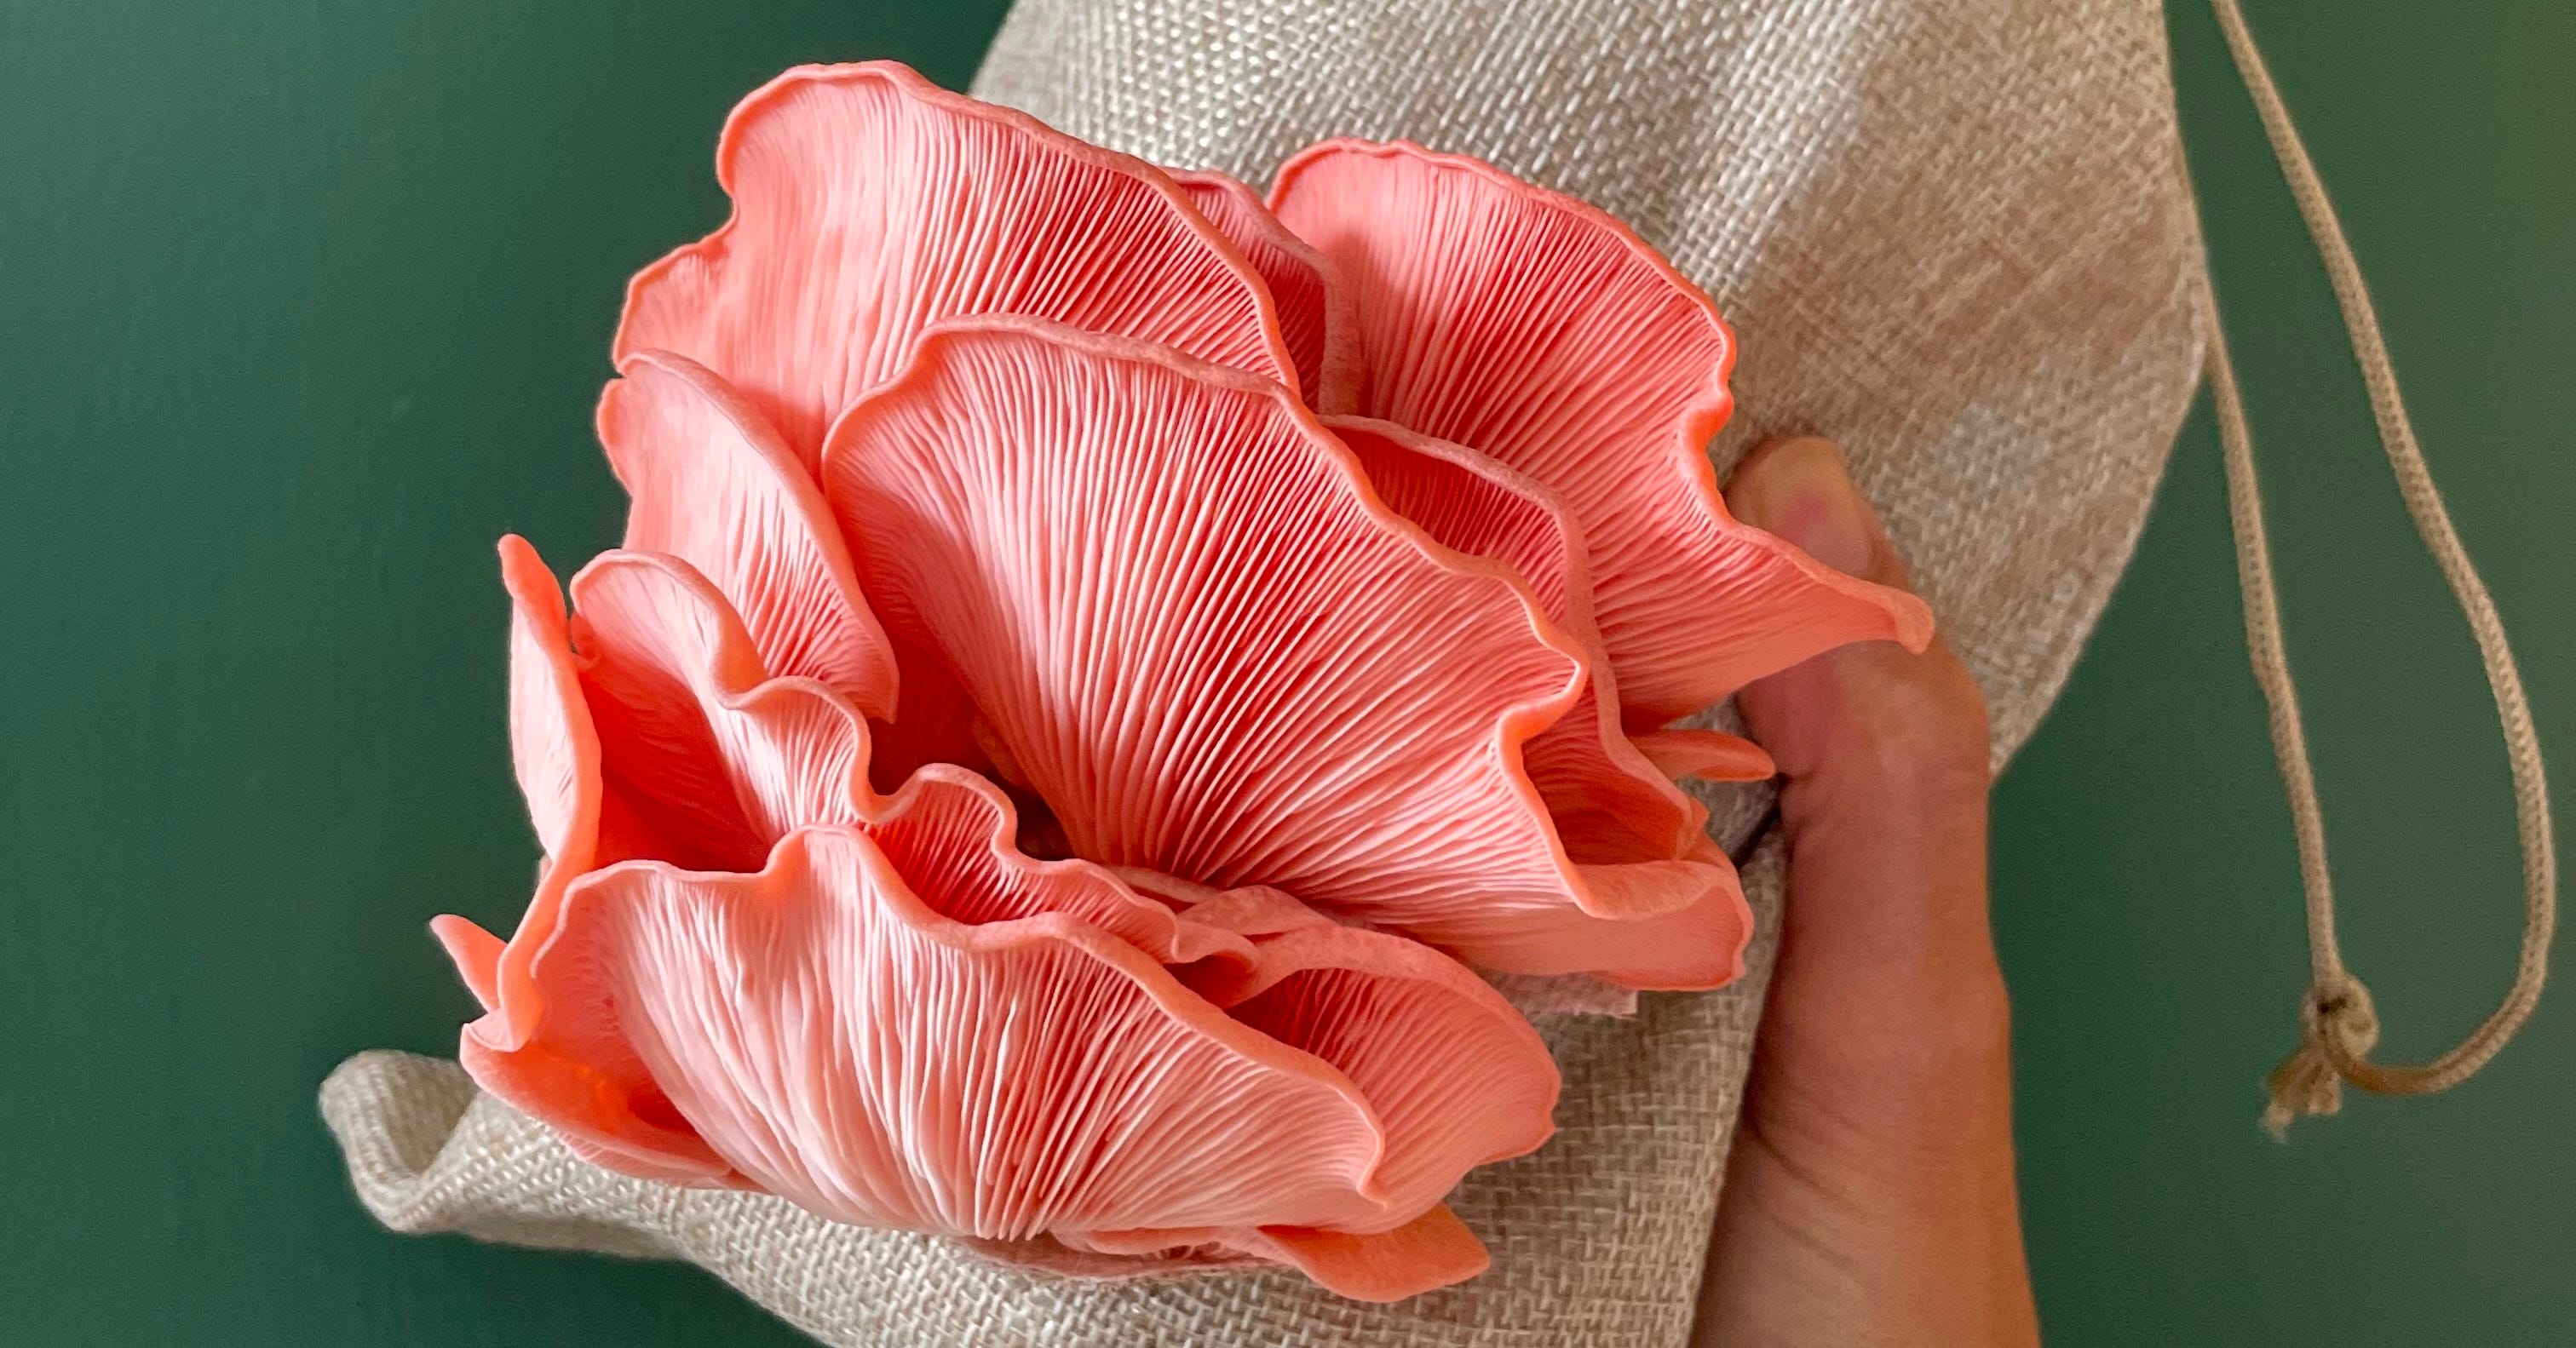
After your substrate is fully colonised, you introduce it to fruiting conditions: fresh air, humidity and indirect light. Within 5-14 days, tiny ‘pins’ (primordial) appear - your baby mushrooms, the very beginning of a flush. They’ll grow quickly from here, often doubling in size each day, and within a week you could be harvesting your first flush.
One of the most remarkable things about mushroom growing is that most kits will produce not just one flush but two, three or even more - each successive flush slightly smaller than the last as the substrate’s nutrients are gradually used up. Between flushes, give your kit a rest, keep it misted, and be patient. The next wave is usually on its way.
At Caley Brothers, we recommend harvesting just before the caps begin to flatten and the edges start to curl upward. That’s the sweet spot - full flavour, perfect texture, and you’ll get the most from each flush.
Inoculation
The moment spawn meets substrate
Inoculation is the process of introducing your spawn to your substrate - the point at which the transformation begins.
In practice, for most home growing projects, this is beautifully simple: hydrate your substrate, add your spawn, place it in a clean environment with a little airflow, and wait. The mycelium will do the rest, spreading outward from each grain of spawn until the whole substrate is colonised.
The key to successful inoculation is cleanliness. Mycelium is robust, but in the early stages of colonisation it can face competition from moulds and bacteria. Working with clean hands, clean tools and a clean environment gives your mycelium the best possible head start.
You can read more about this on our journal - our piece on trichoderma and what to do when mould appears is one of our most-read posts.
We cover inoculation in full detail in our autumn workshops - hands-on, from scratch, at the farm.
Places are limited and they sell out. If you’d like to join us this autumn, get in touch or keep an eye on our website for dates.
Pinning
The most exciting moment in mushroom growing
Pinning is what happens when your first tiny mushrooms appear - small, pin-shaped ‘primordia’ that push through the surface of the substrate toward the light and air.
Pins are triggered by a change in conditions: an increase in fresh air (when you open your kit), humidity (daily misting), and indirect light. It’s your mushrooms responding to environmental cues that tell them it’s time to fruit.
If you’re not getting pins, the usual culprits are too little fresh air, too little humidity, or a substrate that isn’t fully colonised yet. Give it time, keep misting, and they’ll come - you can always take a look at our trouble shooting piece for tips and tricks to help get it going.
If you have one of our kits and you’re worried nothing’s happening, visit our help page or get in touch directly - we’re always on hand.
→ Mushroom Kit Trouble Shooting
Colonisation
The patient part - but worth it
Colonisation is the period between inoculation and fruiting - when the mycelium is quietly spreading through your substrate, breaking it down and establishing itself.
During colonisation, your substrate will gradually turn white as the mycelium threads work their way through. Keep your kit at a stable room temperature - around 18–22°C - and away from fluctuating heat sources like boiler cupboards, dishwashers or ovens. For most oyster mushroom varieties, full colonisation takes around 21 days.
This is the phase that requires the most patience. Inside the bag or block, something quite extraordinary is taking place - the mycelium is transforming a collection of organic materials into a living, unified structure. By the time it’s done, your substrate will be bound together into a firm block, earthy-smelling, completely white, and ready to fruit.
Don’t rush it. A fully colonised block gives you the best possible flushes.
Putting it all together
If you’re new to mushroom growing, here’s the whole process in plain English, using the words you now know:
You start with spawn - mycelium grown onto grain. You introduce it to a substrate (wood, straw, coffee grounds - whatever your chosen variety likes best). That’s inoculation. Over the next few weeks, the mycelium colonises the substrate, spreading through it and binding it together. Once fully colonised, you trigger fruiting conditions - fresh air, humidity, indirect light - and pins appear. Those pins grow into a full flush of mushrooms, ready to harvest. Then the whole thing rests, and does it again.
That’s it. That’s mushroom growing. It’s not complicated - it’s just a language you weren’t taught yet.
Ready to start growing?
Our grow kits come with everything you need - from fresh spawn, substrate, grow bag’s and full step-by-step instructions, depending on what you want to grow and how you want to grow it. No experience needed, no specialist equipment, and absolutely no damp dark cellar required.
If you want to go a step further and make your own kits from scratch, our fresh mushroom spawn is available to order directly from the farm - chilled and dispatched fresh so it arrives in the best possible condition.
And if you want to go deeper still - into the science, the growing, the cooking and the community that goes with all of it - our book Project Mushroom is where we started. Every term in this glossary, every technique, every lesson from the farm. It’s all in there.
Where to next?
→ Get our book - Project Mushroom
→ Join us online at one of our workshops this autumn
→ Follow us on Substack for new posts twice a month
If you found this useful, you’re in the right place. We’re Lorraine and Jodie - the Caley Brothers - a small mushroom farm in West Sussex, eight-times medal winners at the RHS Chelsea Flower Show and Gardeners’ World Live, collaborators with Kew Gardens, the Tate Modern and the RHS, and authors of Project Mushroom. Growing mushrooms is all we do, and sharing what we know is why we’re here.
The best way to stay close to what we’re doing - new varieties, growing guides, recipes, behind-the-scenes life at the farm and the honest reality of running a small mushroom business - is to subscribe. It’s free, it goes out twice a month, and we promise it’s always worth your time.


Leave a comment